Multiple plane fitting algorithm to evaluate the accuracy of 3D point cloud using structured light measurement
Abstract 3D shape measurement by structured light is a high-Speed method and capable of profiling complex surfaces. In particular, the processing of measuring data also greatly affects the accuracy of obtained point clouds. In this paper, an algorithm to detect multiple planes on point cloud data was developed based on RANSAC algorithm to evaluate the accuracy of point cloud measured by structural light. To evaluate the accuracy of the point cloud obtained, two-step height parts are used. The planes are detected and the distance between them needs to be measured with high accuracy. Therefore, the distance measurement data between the planes found in the point cloud is compared with the data measured by CMM measurement. The experimental results have shown that the proposed algorithm can identify multiple planes at the same time with a maximum standard deviation of 0.068 (mm) and the maximum relative error is 1.46%
Trang 1
Trang 2
Trang 3
Trang 4
Trang 5
Trang 6
Tóm tắt nội dung tài liệu: Multiple plane fitting algorithm to evaluate the accuracy of 3D point cloud using structured light measurement
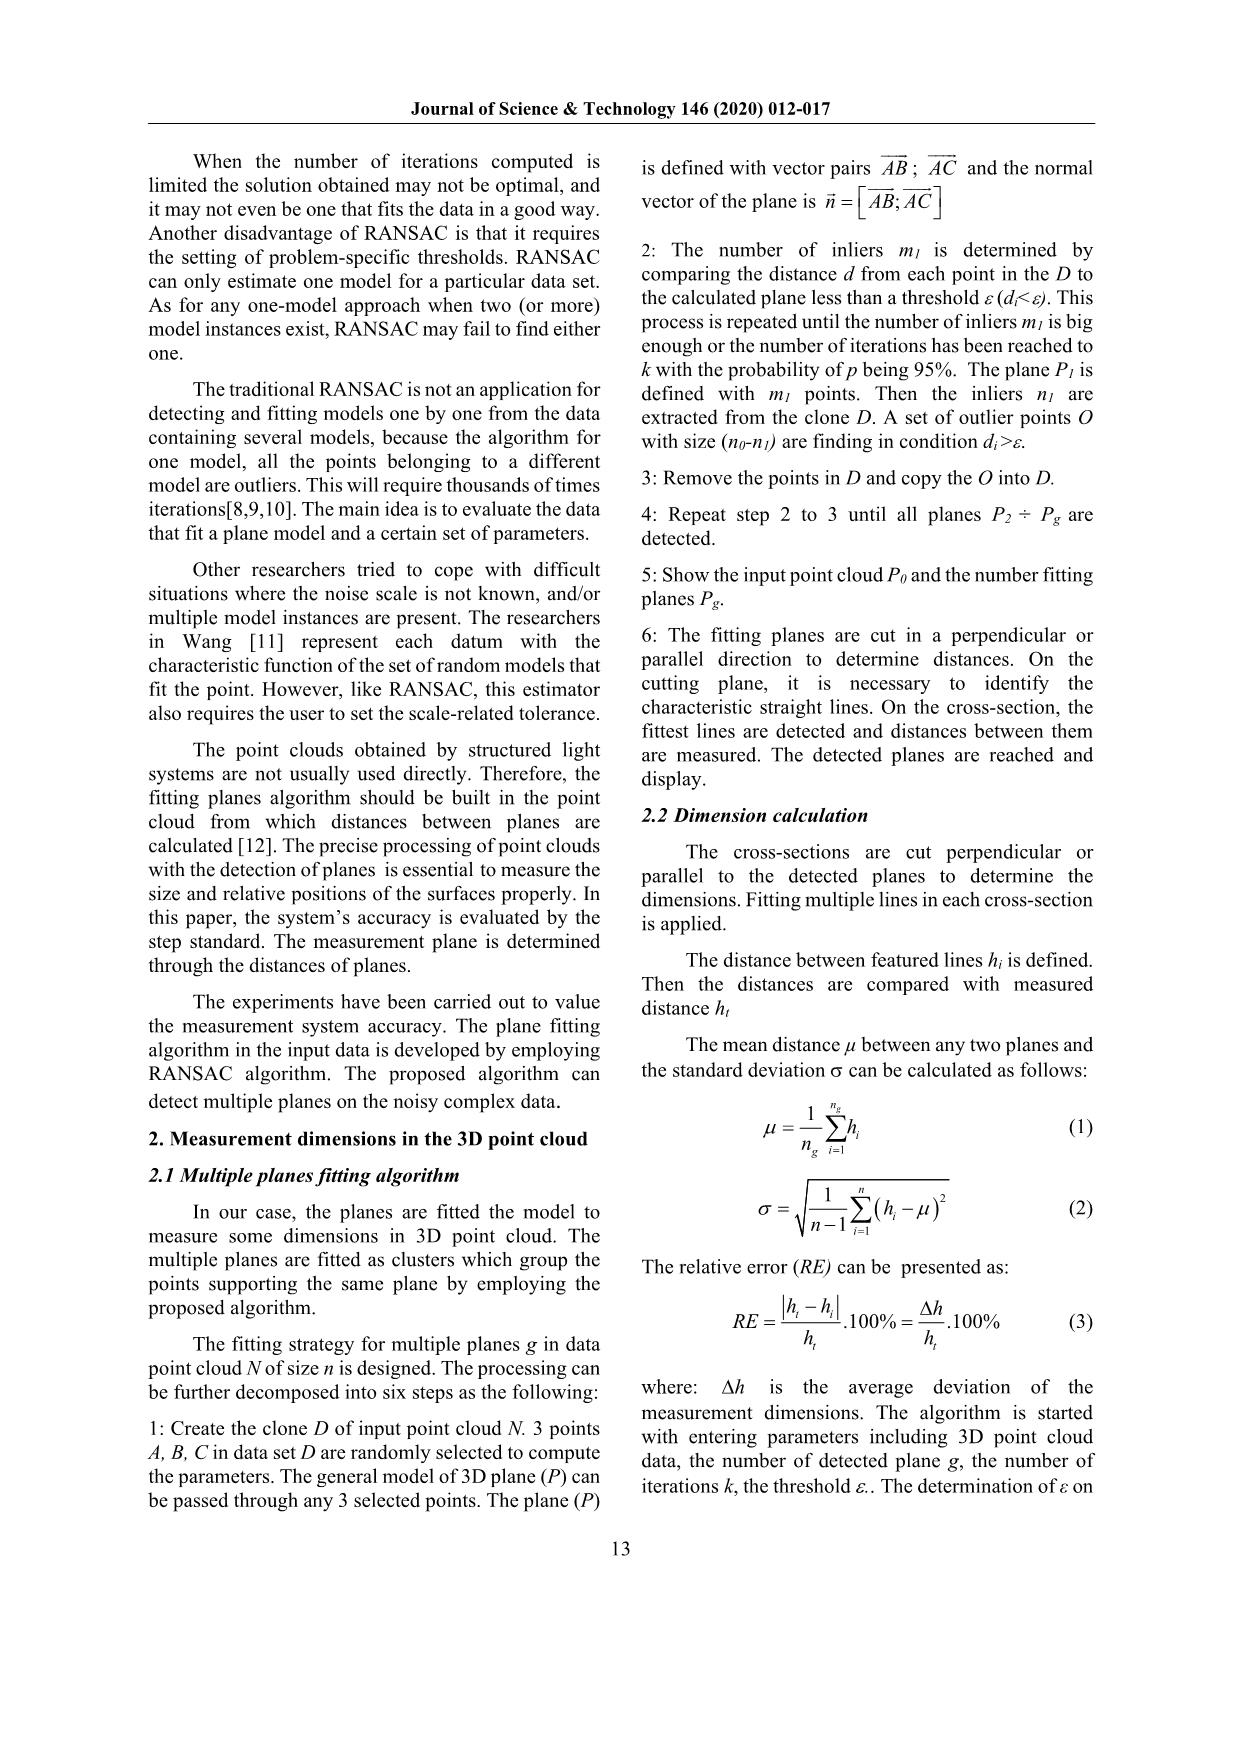
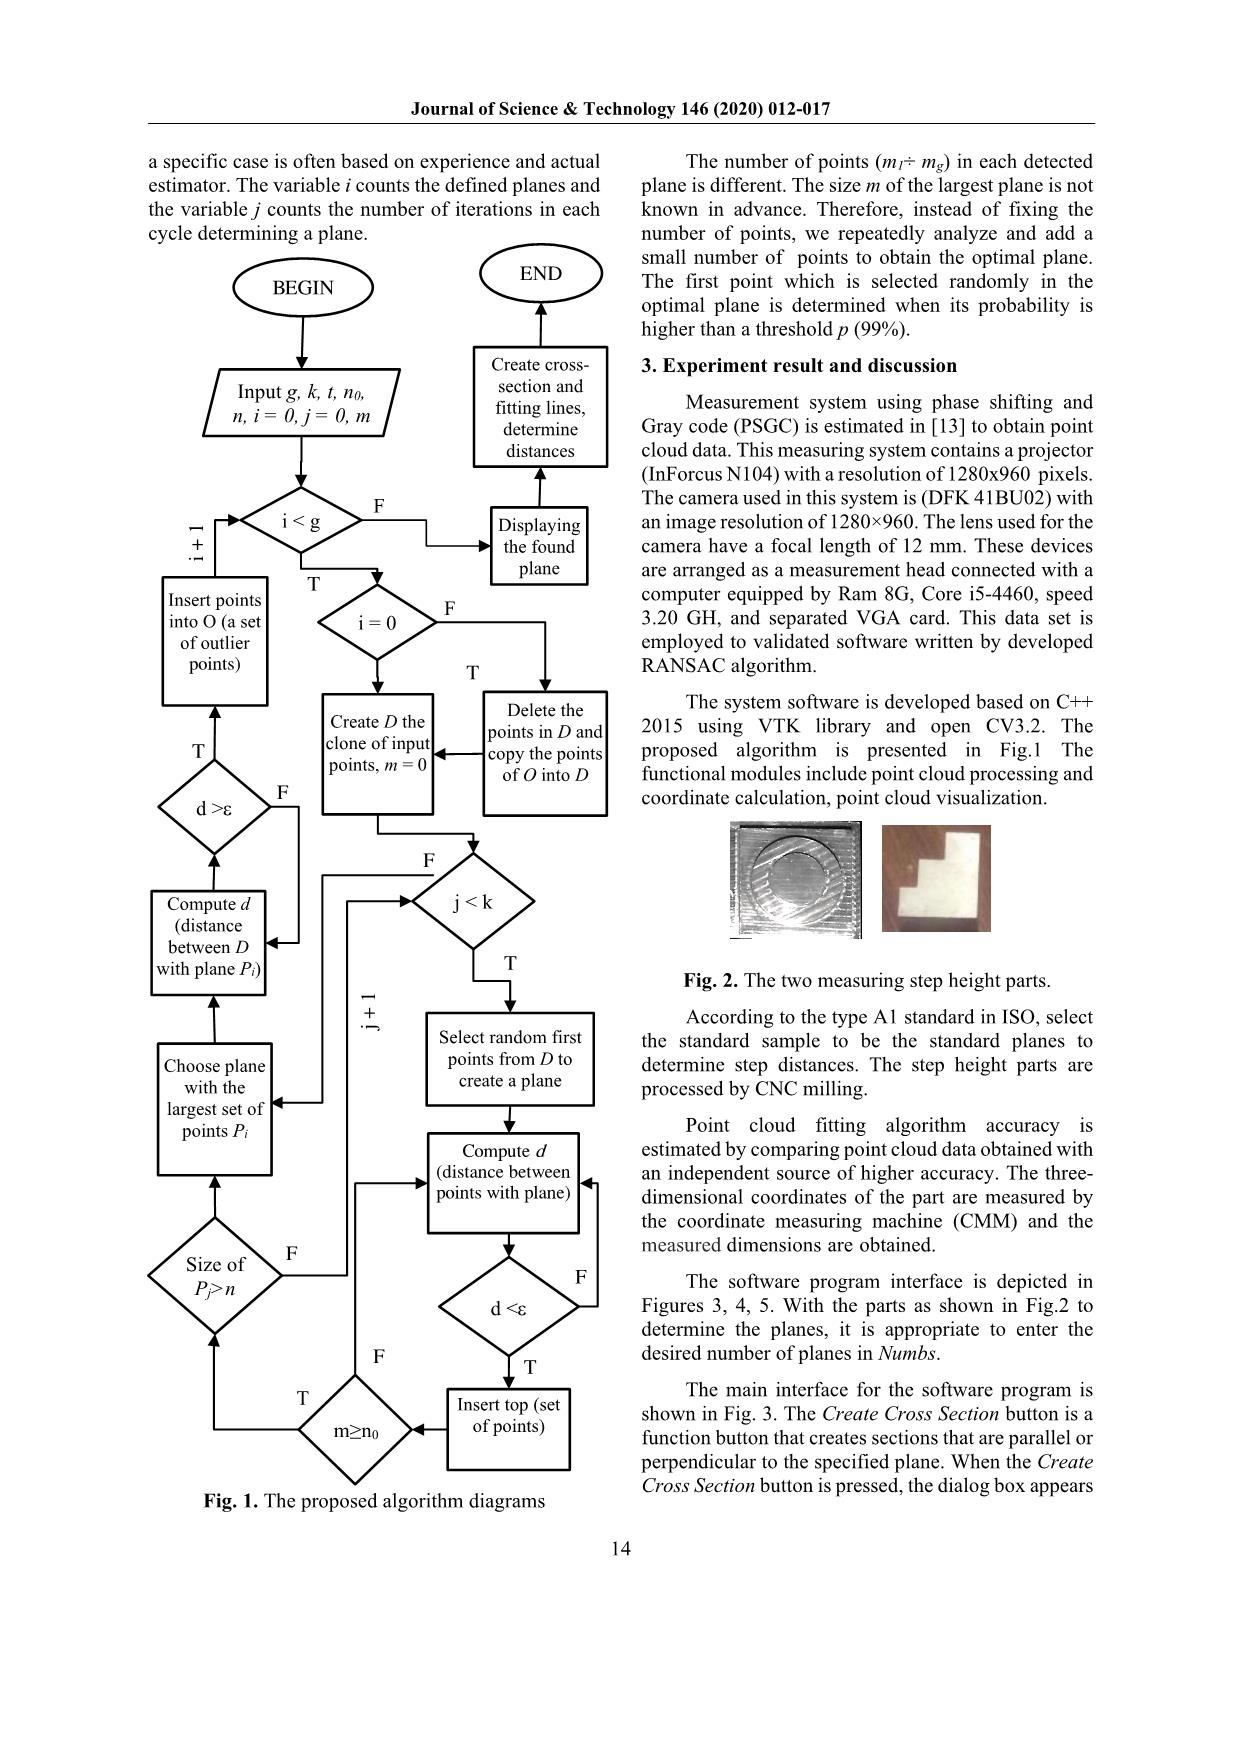
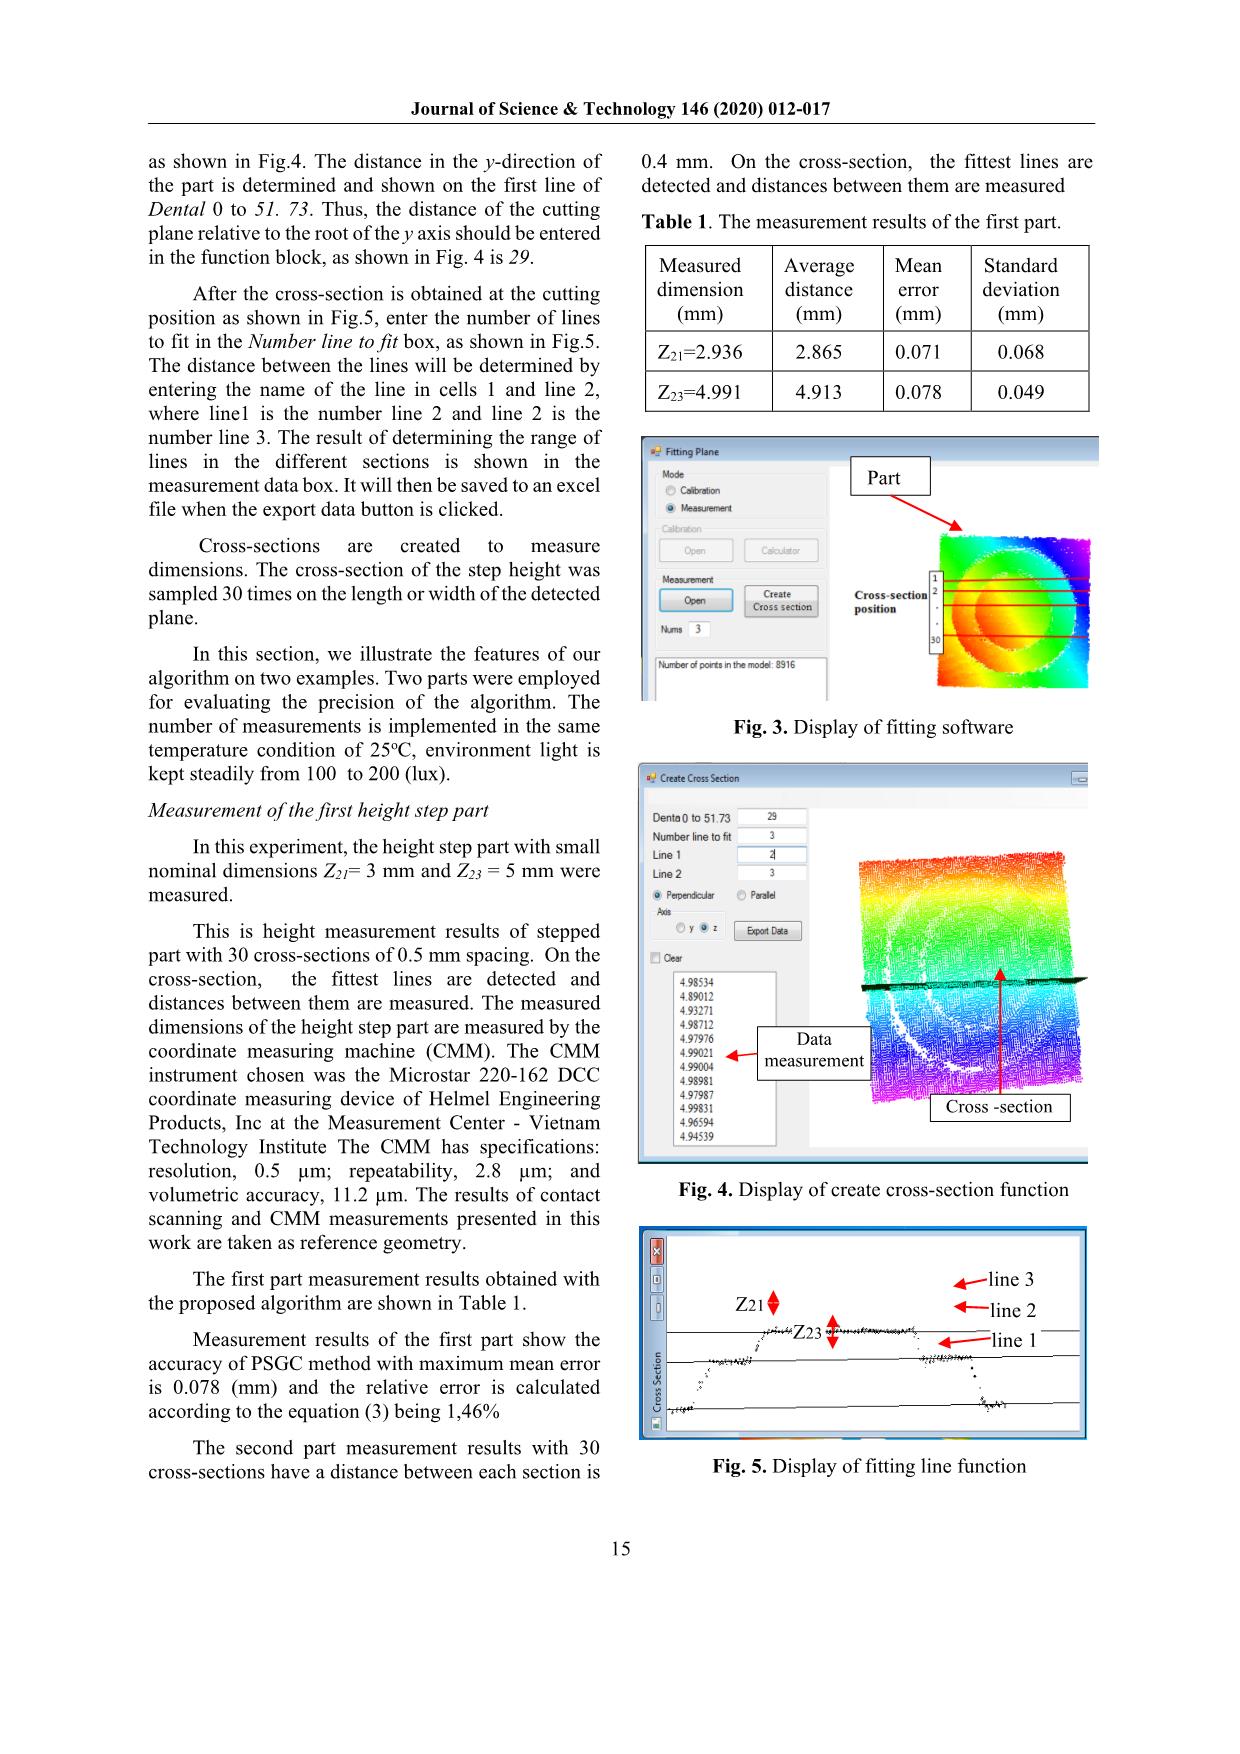
hich distances between planes are calculated [12]. The precise processing of point clouds with the detection of planes is essential to measure the size and relative positions of the surfaces properly. In this paper, the system’s accuracy is evaluated by the step standard. The measurement plane is determined through the distances of planes. The experiments have been carried out to value the measurement system accuracy. The plane fitting algorithm in the input data is developed by employing RANSAC algorithm. The proposed algorithm can detect multiple planes on the noisy complex data. 2. Measurement dimensions in the 3D point cloud 2.1 Multiple planes fitting algorithm In our case, the planes are fitted the model to measure some dimensions in 3D point cloud. The multiple planes are fitted as clusters which group the points supporting the same plane by employing the proposed algorithm. The fitting strategy for multiple planes g in data point cloud N of size n is designed. The processing can be further decomposed into six steps as the following: 1: Create the clone D of input point cloud N. 3 points A, B, C in data set D are randomly selected to compute the parameters. The general model of 3D plane (P) can be passed through any 3 selected points. The plane (P) is defined with vector pairs AB ; AC and the normal vector of the plane is ;n AB AC = 2: The number of inliers m1 is determined by comparing the distance d from each point in the D to the calculated plane less than a threshold ε (di<ε). This process is repeated until the number of inliers m1 is big enough or the number of iterations has been reached to k with the probability of p being 95%. The plane P1 is defined with m1 points. Then the inliers n1 are extracted from the clone D. A set of outlier points O with size (n0-n1) are finding in condition di >ε. 3: Remove the points in D and copy the O into D. 4: Repeat step 2 to 3 until all planes P2 ÷ Pg are detected. 5: Show the input point cloud P0 and the number fitting planes Pg. 6: The fitting planes are cut in a perpendicular or parallel direction to determine distances. On the cutting plane, it is necessary to identify the characteristic straight lines. On the cross-section, the fittest lines are detected and distances between them are measured. The detected planes are reached and display. 2.2 Dimension calculation The cross-sections are cut perpendicular or parallel to the detected planes to determine the dimensions. Fitting multiple lines in each cross-section is applied. The distance between featured lines hi is defined. Then the distances are compared with measured distance ht The mean distance µ between any two planes and the standard deviation σ can be calculated as follows: 1 1 gn i ig h n µ = = ∑ (1) ( )2 1 1 1 n i i h n σ µ = = − − ∑ (2) The relative error (RE) can be presented as: .100% .100%t i t t h h hRE h h − ∆ = = (3) where: h∆ is the average deviation of the measurement dimensions. The algorithm is started with entering parameters including 3D point cloud data, the number of detected plane g, the number of iterations k, the threshold ε.. The determination of ε on Journal of Science & Technology 146 (2020) 012-017 14 a specific case is often based on experience and actual estimator. The variable i counts the defined planes and the variable j counts the number of iterations in each cycle determining a plane. Fig. 1. The proposed algorithm diagrams The number of points (m1÷ mg) in each detected plane is different. The size m of the largest plane is not known in advance. Therefore, instead of fixing the number of points, we repeatedly analyze and add a small number of points to obtain the optimal plane. The first point which is selected randomly in the optimal plane is determined when its probability is higher than a threshold p (99%). 3. Experiment result and discussion Measurement system using phase shifting and Gray code (PSGC) is estimated in [13] to obtain point cloud data. This measuring system contains a projector (InForcus N104) with a resolution of 1280x960 pixels. The camera used in this system is (DFK 41BU02) with an image resolution of 1280×960. The lens used for the camera have a focal length of 12 mm. These devices are arranged as a measurement head connected with a computer equipped by Ram 8G, Core i5-4460, speed 3.20 GH, and separated VGA card. This data set is employed to validated software written by developed RANSAC algorithm. The system software is developed based on C++ 2015 using VTK library and open CV3.2. The proposed algorithm is presented in Fig.1 The functional modules include point cloud processing and coordinate calculation, point cloud visualization. Fig. 2. The two measuring step height parts. According to the type A1 standard in ISO, select the standard sample to be the standard planes to determine step distances. The step height parts are processed by CNC milling. Point cloud fitting algorithm accuracy is estimated by comparing point cloud data obtained with an independent source of higher accuracy. The three- dimensional coordinates of the part are measured by the coordinate measuring machine (CMM) and the measured dimensions are obtained. The software program interface is depicted in Figures 3, 4, 5. With the parts as shown in Fig.2 to determine the planes, it is appropriate to enter the desired number of planes in Numbs. The main interface for the software program is shown in Fig. 3. The Create Cross Section button is a function button that creates sections that are parallel or perpendicular to the specified plane. When the Create Cross Section button is pressed, the dialog box appears Create cross- section and fitting lines, determine distances F T j + 1 T T T F T F T T Select random first points from D to create a plane Compute d (distance between points with plane) d <ε Insert top (set of points) Choose plane with the largest set of points Pi Size of Pj>n i + 1 j < k Create D the clone of input points, m = 0 i = 0 d >ε Compute d (distance between D with plane Pi) Insert points into O (a set of outlier points) Delete the points in D and copy the points of O into D m≥n0 BEGIN Input g, k, t, n0, n, i = 0, j = 0, m i < g Displaying the found plane END F F F F Journal of Science & Technology 146 (2020) 012-017 15 as shown in Fig.4. The distance in the y-direction of the part is determined and shown on the first line of Dental 0 to 51. 73. Thus, the distance of the cutting plane relative to the root of the y axis should be entered in the function block, as shown in Fig. 4 is 29. After the cross-section is obtained at the cutting position as shown in Fig.5, enter the number of lines to fit in the Number line to fit box, as shown in Fig.5. The distance between the lines will be determined by entering the name of the line in cells 1 and line 2, where line1 is the number line 2 and line 2 is the number line 3. The result of determining the range of lines in the different sections is shown in the measurement data box. It will then be saved to an excel file when the export data button is clicked. Cross-sections are created to measure dimensions. The cross-section of the step height was sampled 30 times on the length or width of the detected plane. In this section, we illustrate the features of our algorithm on two examples. Two parts were employed for evaluating the precision of the algorithm. The number of measurements is implemented in the same temperature condition of 25oC, environment light is kept steadily from 100 to 200 (lux). Measurement of the first height step part In this experiment, the height step part with small nominal dimensions Z21= 3 mm and Z23 = 5 mm were measured. This is height measurement results of stepped part with 30 cross-sections of 0.5 mm spacing. On the cross-section, the fittest lines are detected and distances between them are measured. The measured dimensions of the height step part are measured by the coordinate measuring machine (CMM). The CMM instrument chosen was the Microstar 220-162 DCC coordinate measuring device of Helmel Engineering Products, Inc at the Measurement Center - Vietnam Technology Institute The CMM has specifications: resolution, 0.5 µm; repeatability, 2.8 µm; and volumetric accuracy, 11.2 µm. The results of contact scanning and CMM measurements presented in this work are taken as reference geometry. The first part measurement results obtained with the proposed algorithm are shown in Table 1. Measurement results of the first part show the accuracy of PSGC method with maximum mean error is 0.078 (mm) and the relative error is calculated according to the equation (3) being 1,46% The second part measurement results with 30 cross-sections have a distance between each section is 0.4 mm. On the cross-section, the fittest lines are detected and distances between them are measured Table 1. The measurement results of the first part. Measured dimension (mm) Average distance (mm) Mean error (mm) Standard deviation (mm) Z21=2.936 2.865 0.071 0.068 Z23=4.991 4.913 0.078 0.049 Fig. 3. Display of fitting software Fig. 4. Display of create cross-section function Fig. 5. Display of fitting line function Part line 3 line 2 line 1 Cross -section Data measurement Z21 Z23 Journal of Science & Technology 146 (2020) 012-017 16 Measurement the second height step part After fitting the planes on the point cloud of the second height step part, the dimensions between the planes as shown in Fig.6 are determined by Equation (1). Fig. 6. The point cloud of height step part (a) and cross-section (b). Fig. 7. The measurement results of the second height step part Measurement results of the second part are shown in Fig.7. The accuracy of PSGC method with maximum mean error is 0,187 (mm) and the relative error is calculated according to the equation (3) being 0,59 %. From the result of the two experiments, the range of distances in the measuring area is valued. The measured dimensions and average distances are quite close together. It can be noticed that the largest difference was measured on the largest distance. Fitting and measurement experimental results with two-point cloud data show that the algorithm can be applied to a large variety of data from different sources and different quality. With the algorithm and the proposed program, it is possible to identify the planes through which the distances and accuracy of the measuring system can be determined. The experiment proved that the algorithm and equipment can be used with many noise point clouds in stable measurement conditions. 4. Conclusion The proposed method is estimated based on RANSAC algorithm and is built through 6 basic steps. The algorithm is evaluated through defining the planes in 3D point cloud measure on noisy data for a complex model. We have validated our scheme experimentally, on two real data. A contact scan is needed to measure the real piece accurately and to highlight the deviations from the measuring data using the building program. This result is the premise for processing point cloud data. Data sets after using the algorithm also can apply to surface reconstruction and object recognition. In future work, we plan to further develop the shape representations obtained with the algorithm. In this study, the experiments did not take into account the influence of a shiny surface on the results of measurement by structured light. There are some missing information areas in point clouds that are obtained in shiny areas. Therefore, the effect of the specular surface of the measuring part needs to be further studied. Acknowledgments This research is funded by the Hanoi University of Science and Technology (HUST) under project number T2018-PC-035. References [1] J.-A. Beraldin, F. Blais, S. El-Hakim, L. Cournoyer, and M. Picard, Traceable 3D imaging metrology: Evaluation of 3D digitizing techniques in a dedicated metrology Tech. Terr. laser scanning I, no. October 2015, pp. 310–318, 2007. [2] Standards-P. 1: M. ISO 5436-1:2000(E) Surface texture: Profile method; Measurement Measures, Iso 5436-1, vol. GPS. 2000. [3] M. a Fischler and R. C. Bolles, Random Sample Consensus: A Paradigm for Model Fitting with Apphcatlons to Image Analysis and Automated Cartography, Commun. ACM, vol. 24, no. 6, pp. 381– 395, 1981. [4] M. Y. W. Yang and W. Förstner, Plane Detection in Point Cloud Data, Dep. Photogramm. Inst. Geod. Geoinf. Univ. Bonn, no. 1, p. 14 pp, 2010. [5] R. Schnabel, R. Wahl, and R. Klein, Efficient RANSAC for point-cloud shape detection, Comput. Graph. Forum, vol. 26, no. 2, pp. 214–226, 2007. [6] P. H. S. Torr and A. Zisserman, MLESAC: A new d1 d 3 d2 d4 d 5 Cross-section (a) (b) Standard deviation (mm) 0.065 0.122 0.128 0.101 0.187 Journal of Science & Technology 146 (2020) 012-017 17 robust estimator with application to estimating image geometry, Comput. Vis. Image Underst., vol. 78, no. 1, pp. 138–156, 2000. [7] S. Huang, Y. Liu, N. Gao, and Z. Zhang, Distance Calibration between Reference Plane and Screen in Direct Phase Measuring Deflectometry, 2018. [8] B. J. Tordoff and D. W. Murray, Guided-MLESAC: Faster image transform estimation by using matching priors, IEEE Trans. Pattern Anal. Mach. Intell., vol. 27, no. 10, pp. 1523–1535, 2005. [9] O. Galo, R. Manduchi, and A. Rafii, CC-RANSAC: Fitting planes in the presence of multiple surfaces in range data, Pattern Recognit. Lett., vol. 32, no. 3, pp. 403–410, 2011. [10] A. Vedaldi, H. Tin, P. Favaro, and S. Soatto, KALMANSAC: Robust filtering by consensus, Proc. IEEE Int. Conf. Comput. Vis., vol. I, pp. 633–640, 2005. [11] H. Wang and D. Suter, Robust adaptive-scale parametric model estimation for computer vision, IEEE Trans. Pattern Anal. Mach. Intell., vol. 26, no. 11, pp. 1459–1474, 2004. [12] L. Li, F. Yang, H. Zhu, D. Li, Y. Li, and L. Tang, An improved RANSAC for 3D point cloud plane segmentation based on normal distribution transormation cells, Remote Sens., vol. 9, no. 5, 2017. [13] Nguyen Thi Kim Cuc, Nguyen Van Vinh, Nguyen Thanh Hung, Nguyen Viet Kien, Improving the Accuracy of the Calibration Method for Structured Light System, Journal of Science & Technology 127 (2018) 016-021.
File đính kèm:
 multiple_plane_fitting_algorithm_to_evaluate_the_accuracy_of.pdf

