Tài liệu DeploySoftware - FolderRedirectionScript
Chuẩn bị:
- Máy Windows Server 2008 (đã nâng cấp Domain): Server 1
NIC 1: 192.168.1.1/24
- Máy Windows XP: PC 1
NIC 1: 192.168.1.2/24
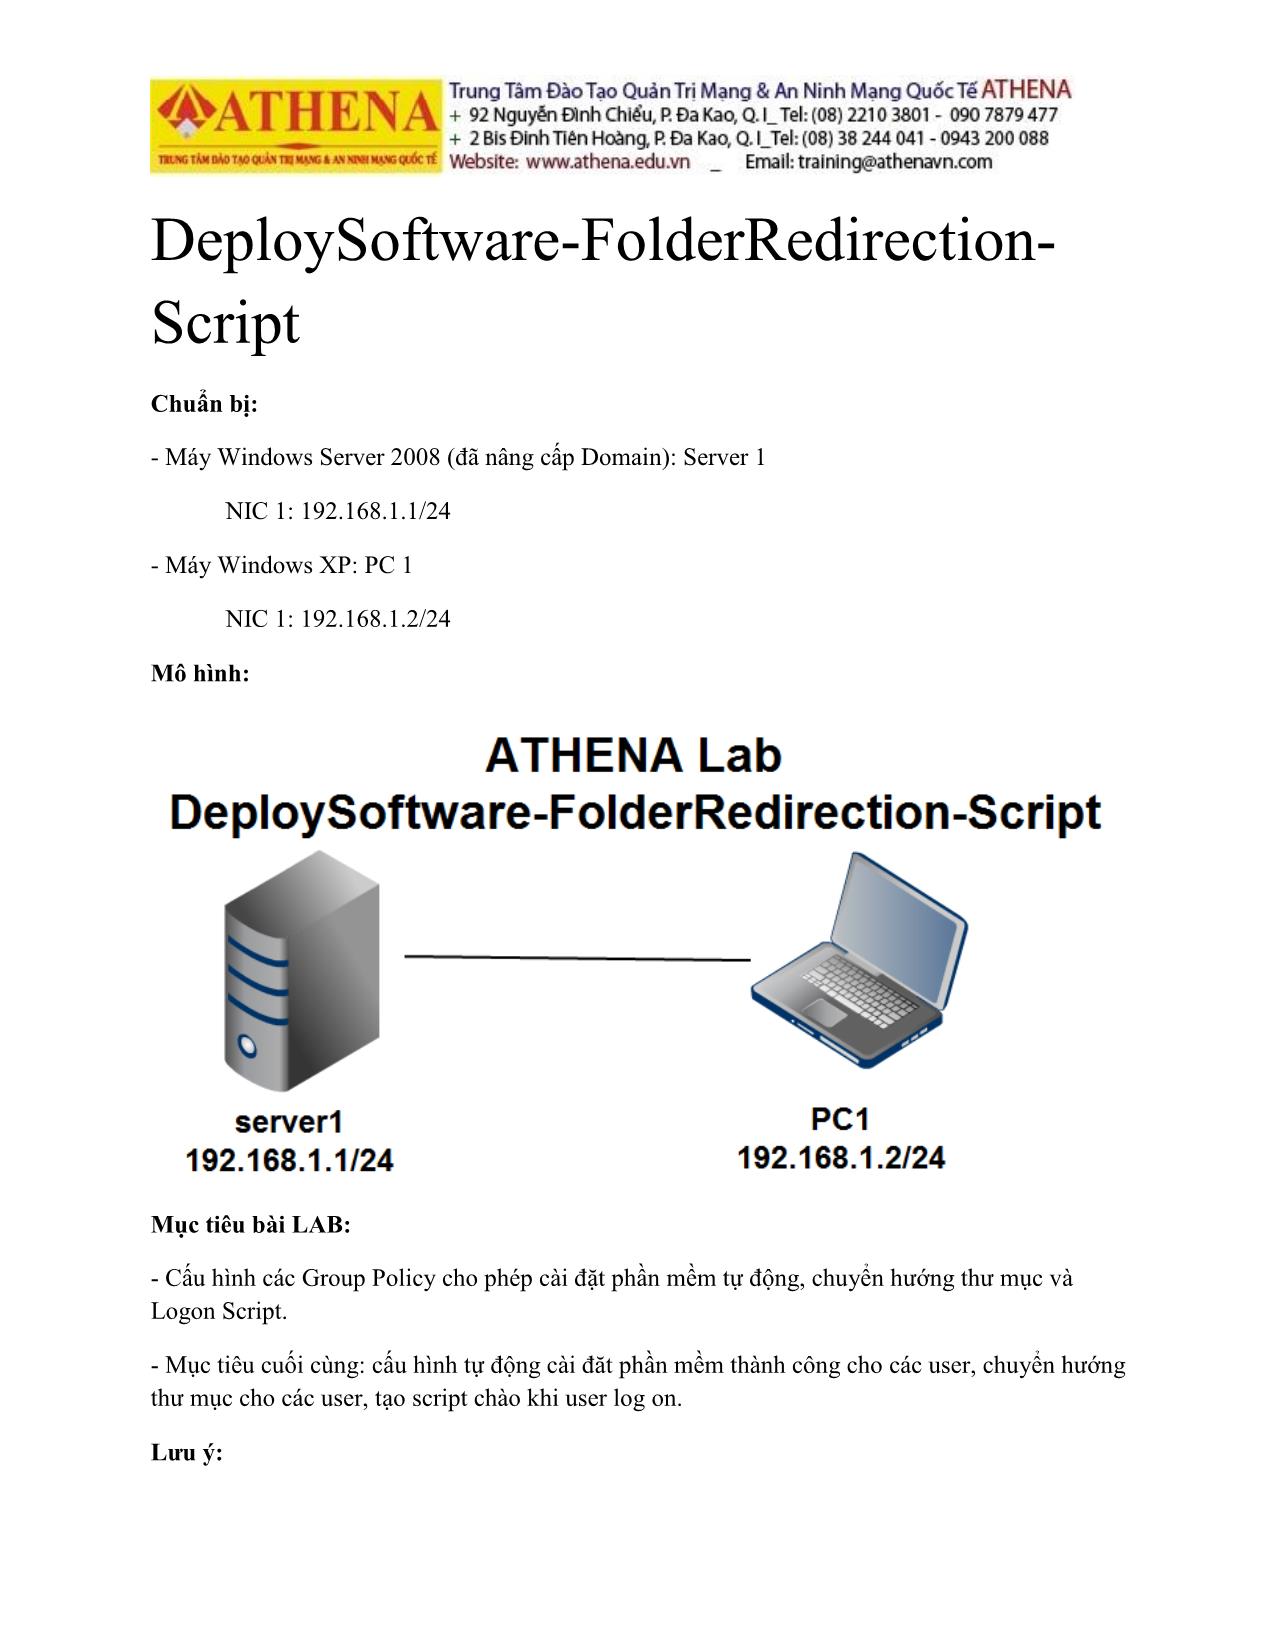
Mô hình:
Mục tiêu bài LAB:
- Cấu hình các Group Policy cho phép cài đặt phần mềm tự động, chuyển hướng thư mục và
Logon Script.
- Mục tiêu cuối cùng: cấu hình tự động cài đăt phần mềm thành công cho các user, chuyển hướng
thư mục cho các user, tạo script chào khi user log on.
Trang 1
Trang 2
Trang 3
Trang 4
Trang 5
Trang 6
Trang 7
Trang 8
Trang 9
Trang 10
Tải về để xem bản đầy đủ
Bạn đang xem 10 trang mẫu của tài liệu "Tài liệu DeploySoftware - FolderRedirectionScript", để tải tài liệu gốc về máy hãy click vào nút Download ở trên
Tóm tắt nội dung tài liệu: Tài liệu DeploySoftware - FolderRedirectionScript
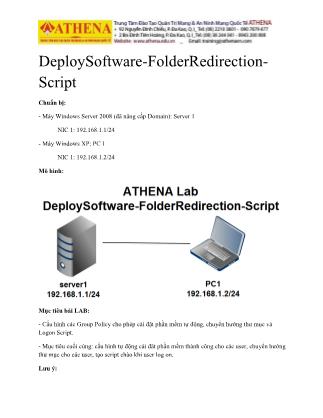
DeploySoftware-FolderRedirection-
Script
Chuẩn bị:
- Máy Windows Server 2008 (đã nâng cấp Domain): Server 1
 NIC 1: 192.168.1.1/24
- Máy Windows XP: PC 1
 NIC 1: 192.168.1.2/24
Mô hình:
Mục tiêu bài LAB:
- Cấu hình các Group Policy cho phép cài đặt phần mềm tự động, chuyển hướng thư mục và
Logon Script.
- Mục tiêu cuối cùng: cấu hình tự động cài đăt phần mềm thành công cho các user, chuyển hướng
thư mục cho các user, tạo script chào khi user log on.
Lưu ý:
 Khi thực hiện trên máy ảo VM-ware, các card mạng sẽ thiết lập ở chế độ HOST ONLY,
 Nên tắt tính năng Windows Firewall trên các máy Server và PC.
Thực Hiện:
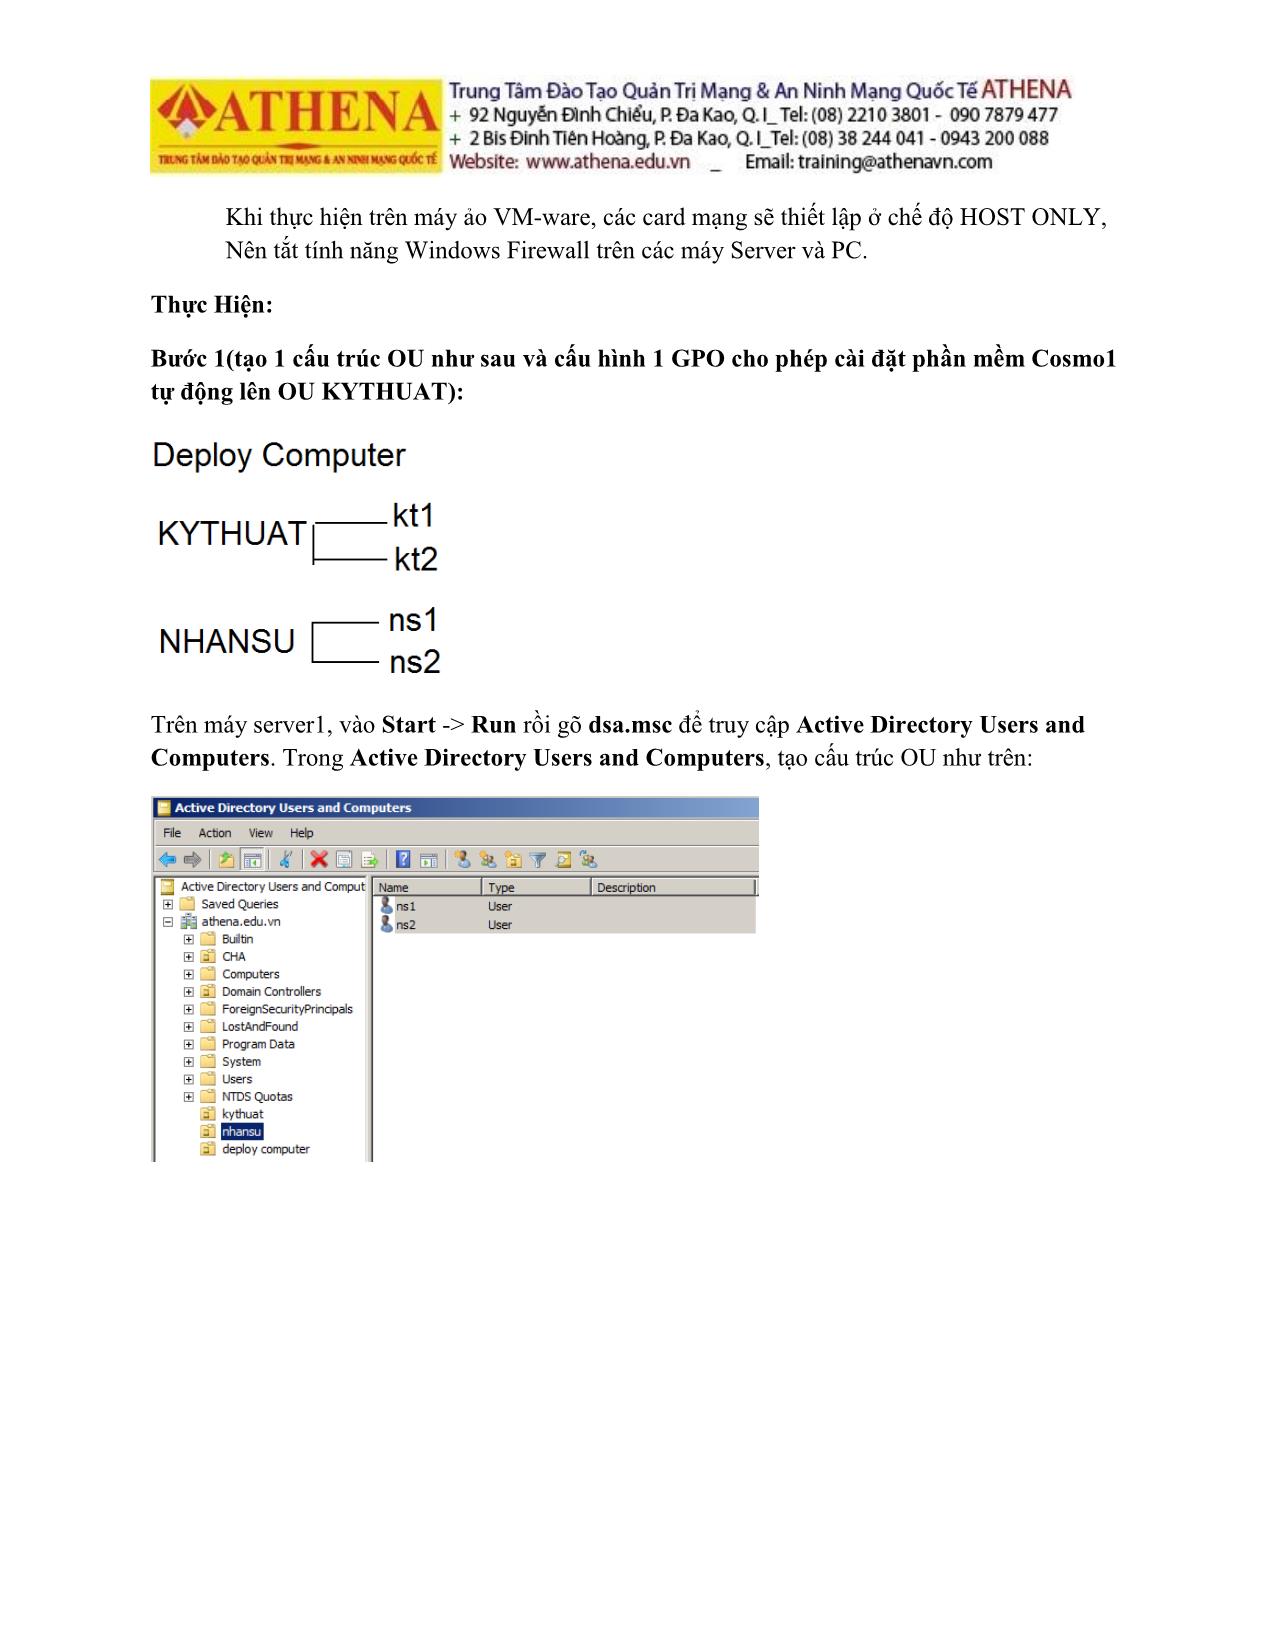
Bước 1(tạo 1 cấu trúc OU như sau và cấu hình 1 GPO cho phép cài đặt phần mềm Cosmo1
tự động lên OU KYTHUAT):
Trên máy server1, vào Start -> Run rồi gõ dsa.msc để truy cập Active Directory Users and
Computers. Trong Active Directory Users and Computers, tạo cấu trúc OU như trên:
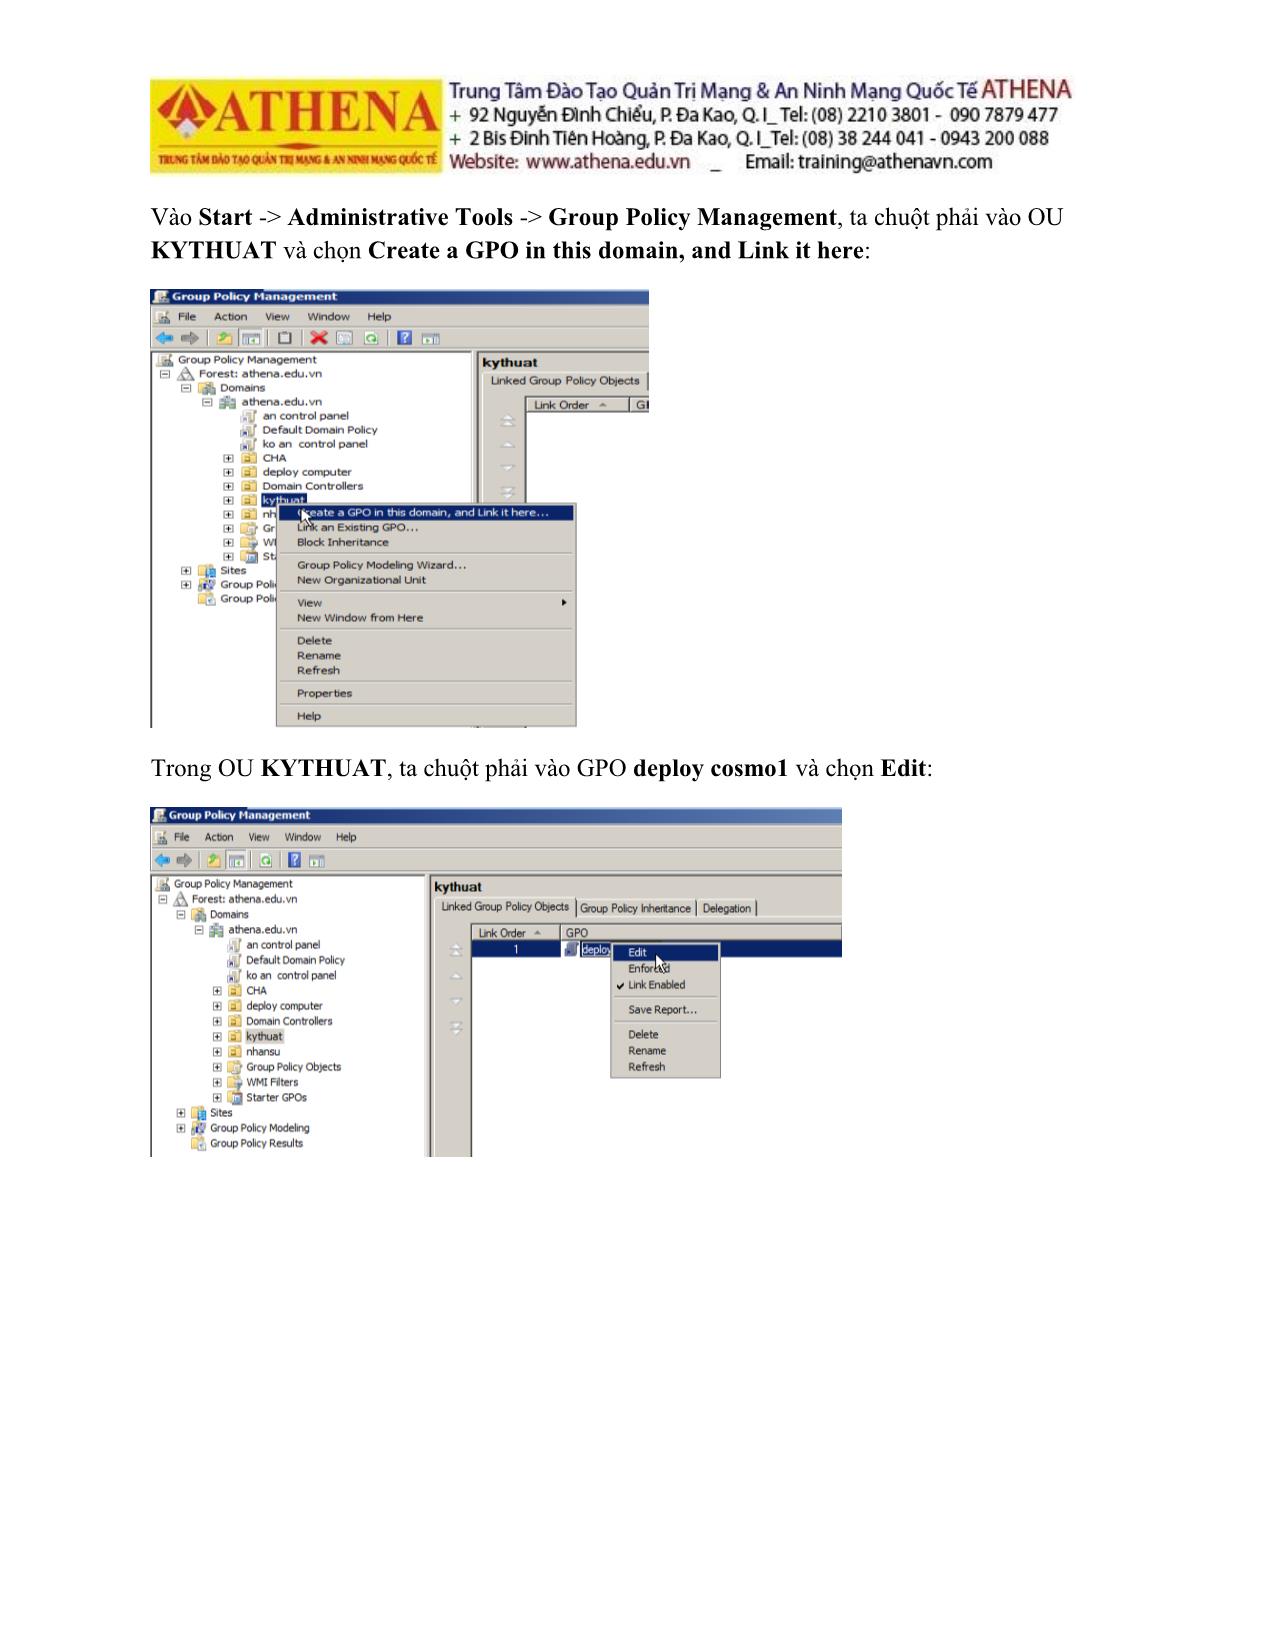
Vào Start -> Administrative Tools -> Group Policy Management, ta chuột phải vào OU
KYTHUAT và chọn Create a GPO in this domain, and Link it here:
Trong OU KYTHUAT, ta chuột phải vào GPO deploy cosmo1 và chọn Edit:
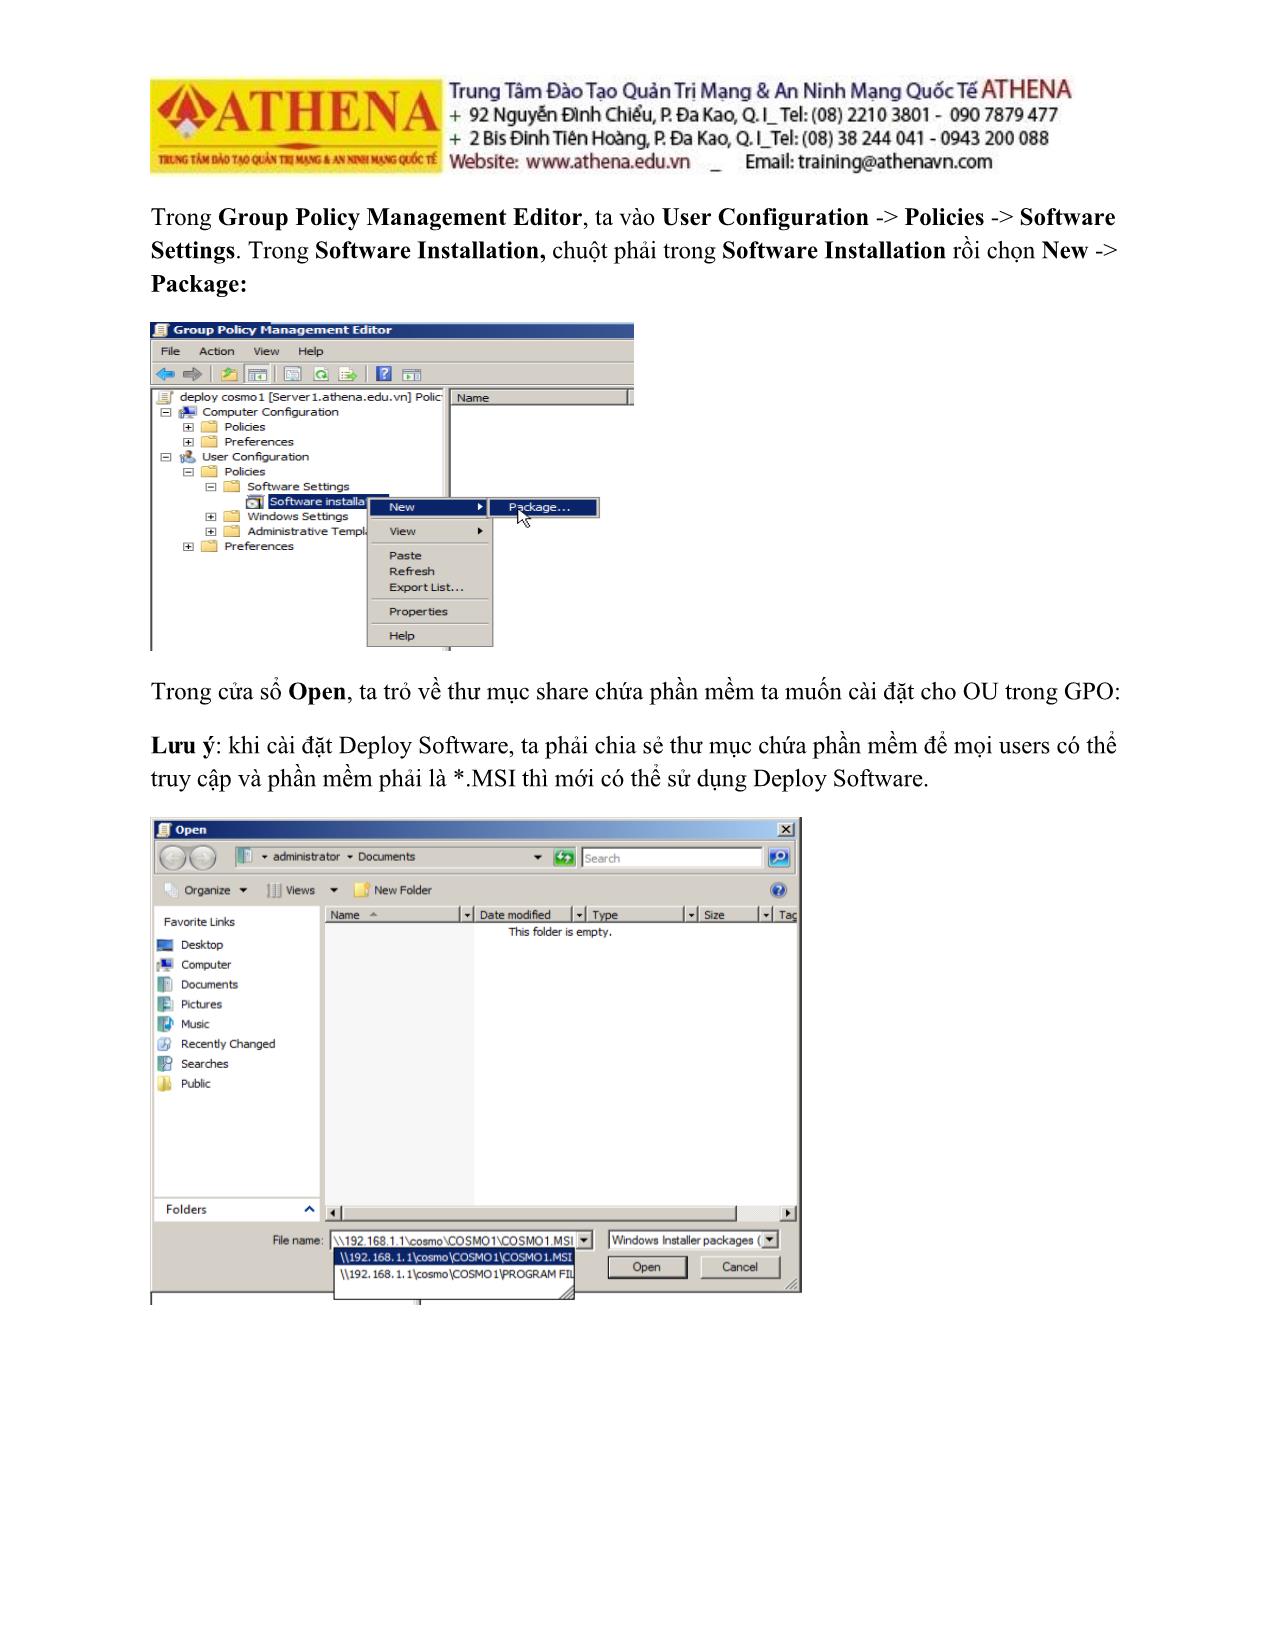
Trong Group Policy Management Editor, ta vào User Configuration -> Policies -> Software
Settings. Trong Software Installation, chuột phải trong Software Installation rồi chọn New ->
Package:
Trong cửa sổ Open, ta trỏ về thư mục share chứa phần mềm ta muốn cài đặt cho OU trong GPO:
Lưu ý: khi cài đặt Deploy Software, ta phải chia sẻ thư mục chứa phần mềm để mọi users có thể
truy cập và phần mềm phải là *.MSI thì mới có thể sử dụng Deploy Software.
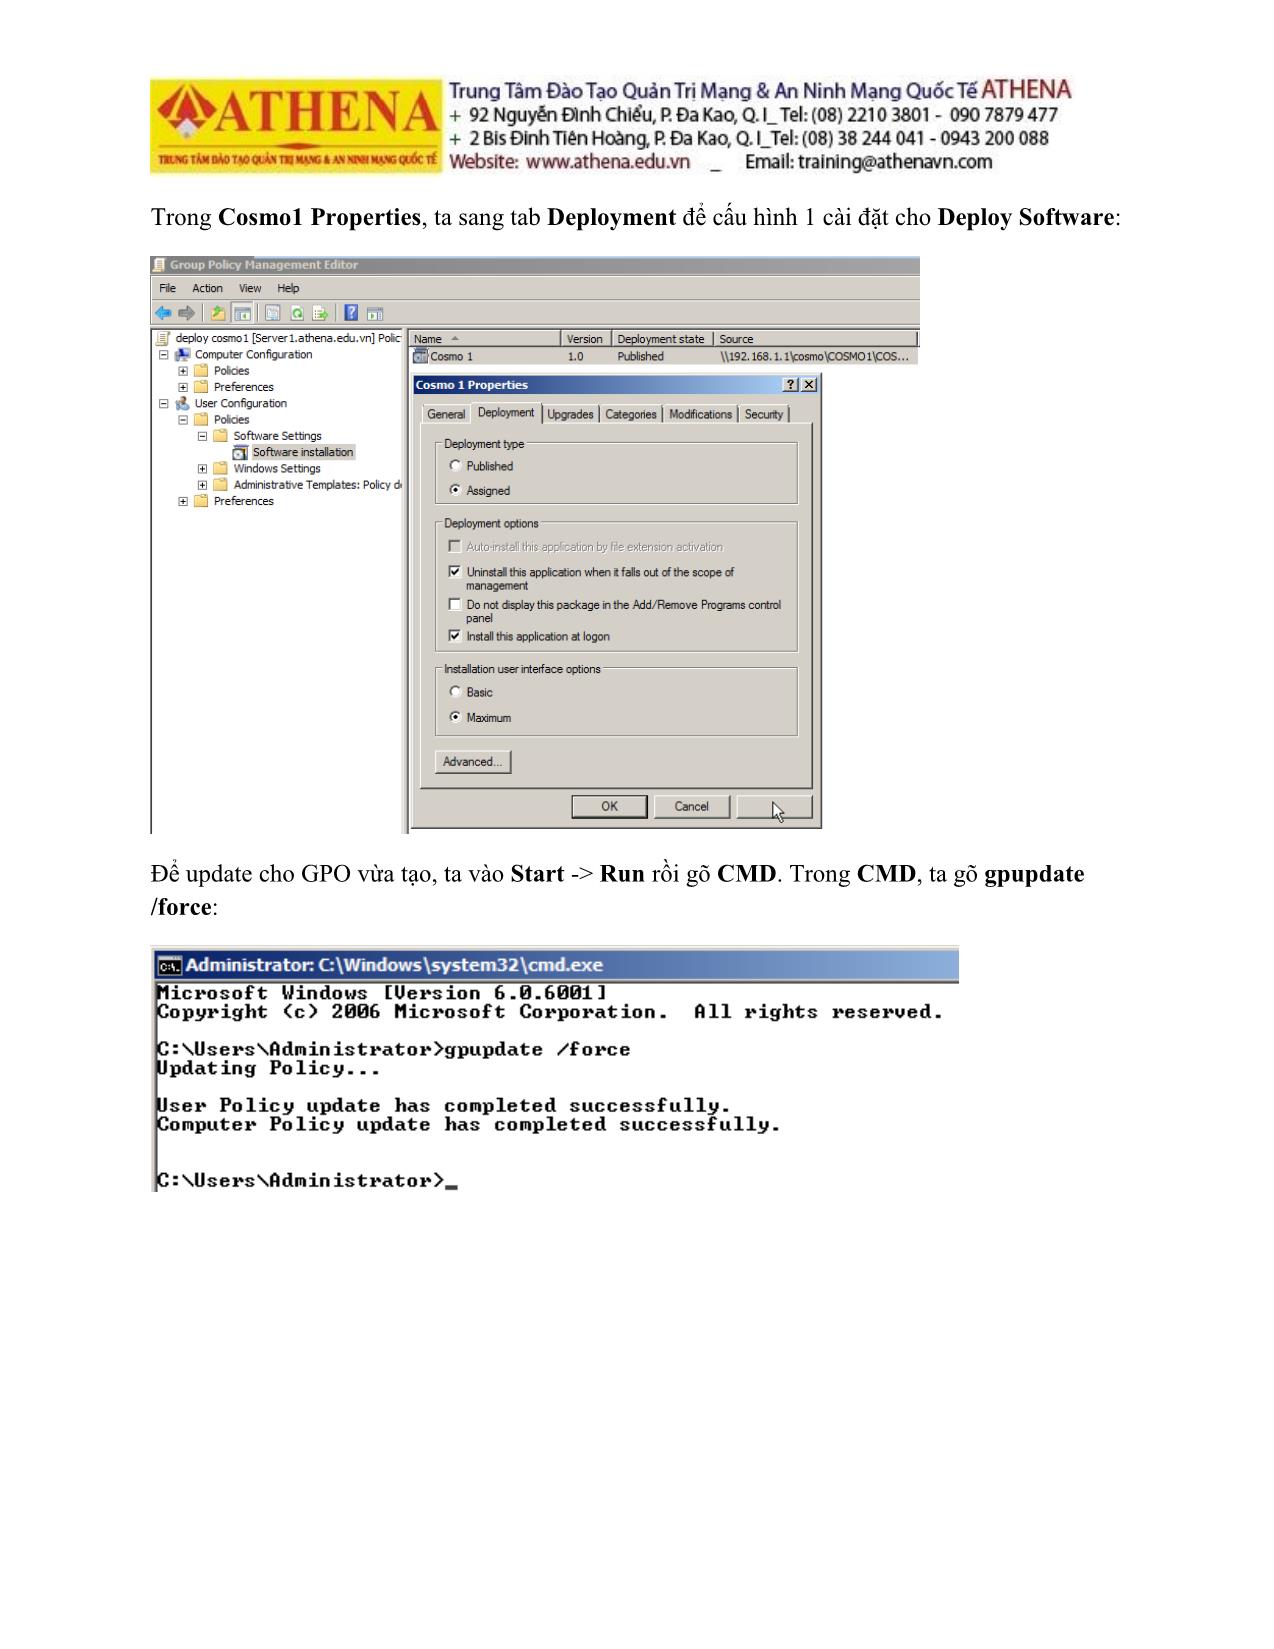
Trong Cosmo1 Properties, ta sang tab Deployment để cấu hình 1 cài đặt cho Deploy Software:
Để update cho GPO vừa tạo, ta vào Start -> Run rồi gõ CMD. Trong CMD, ta gõ gpupdate
/force:
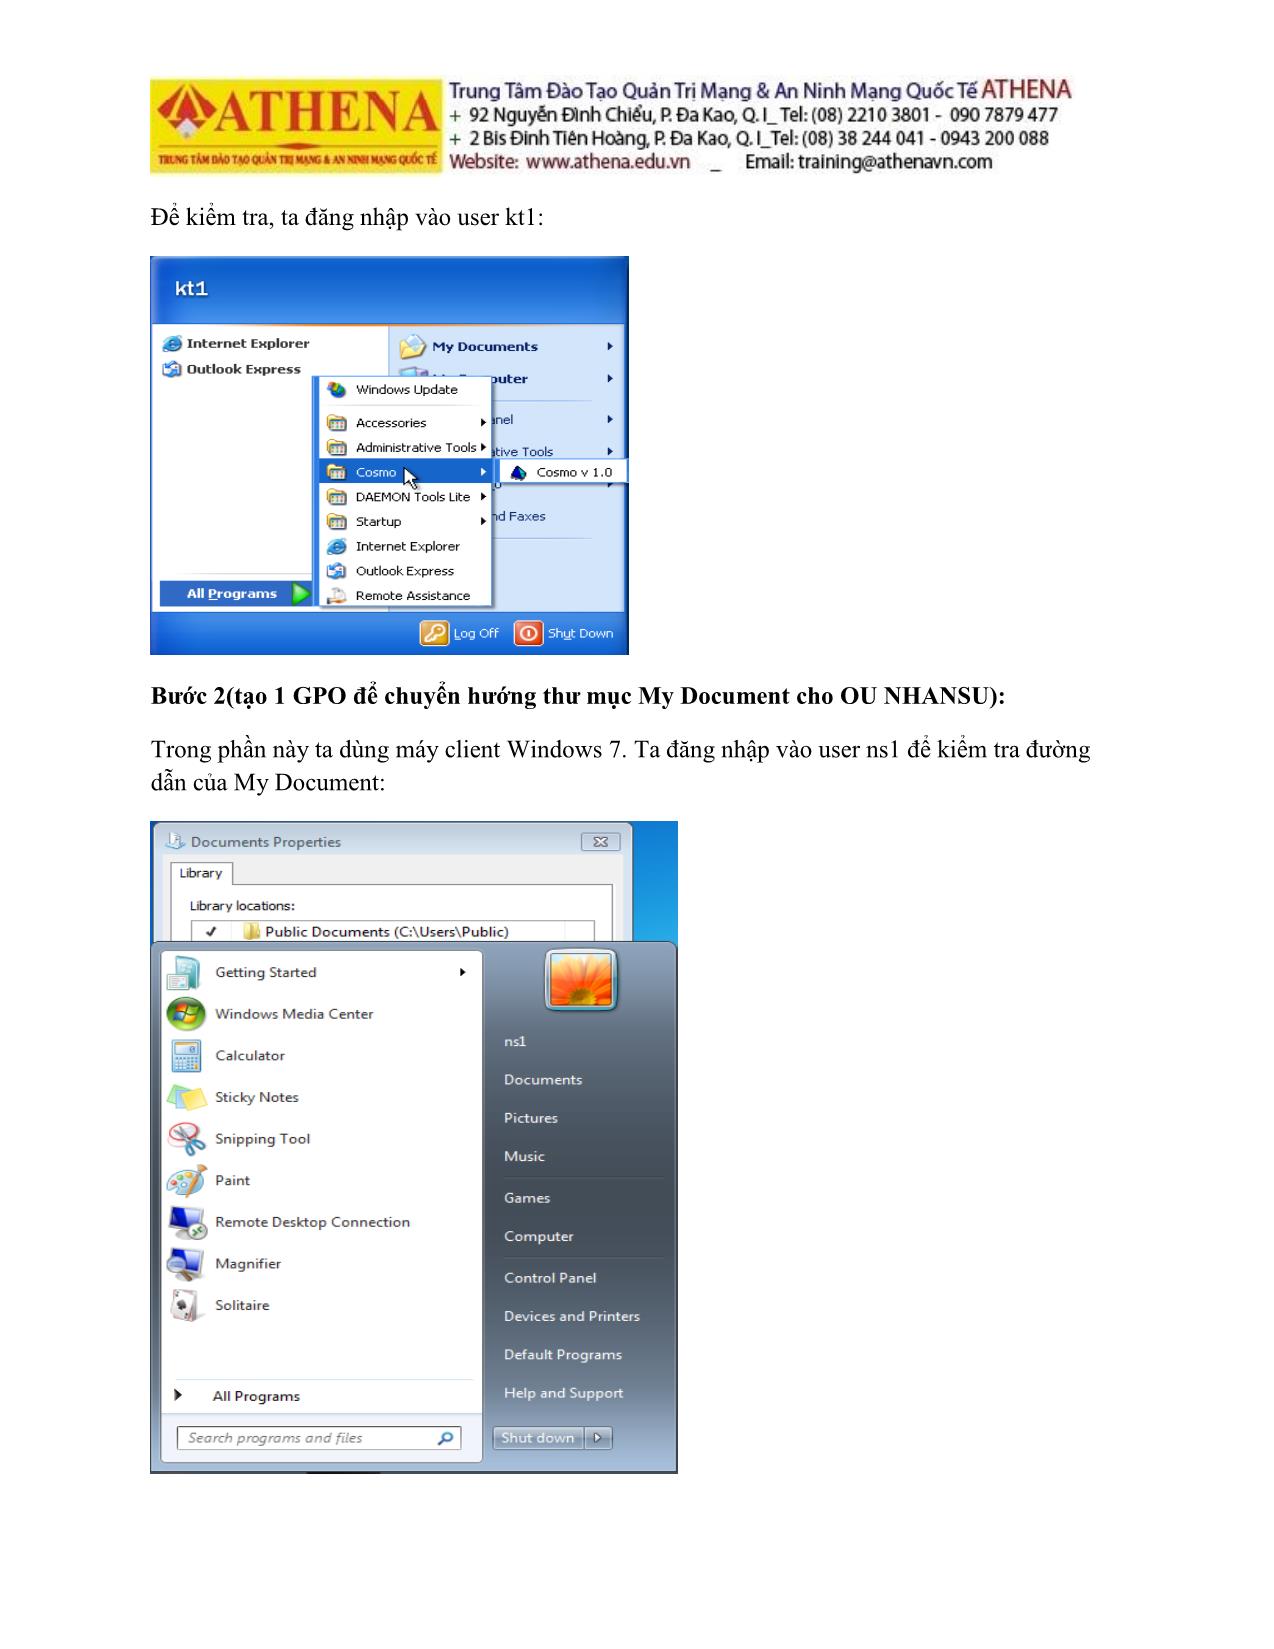
Để kiểm tra, ta đăng nhập vào user kt1:
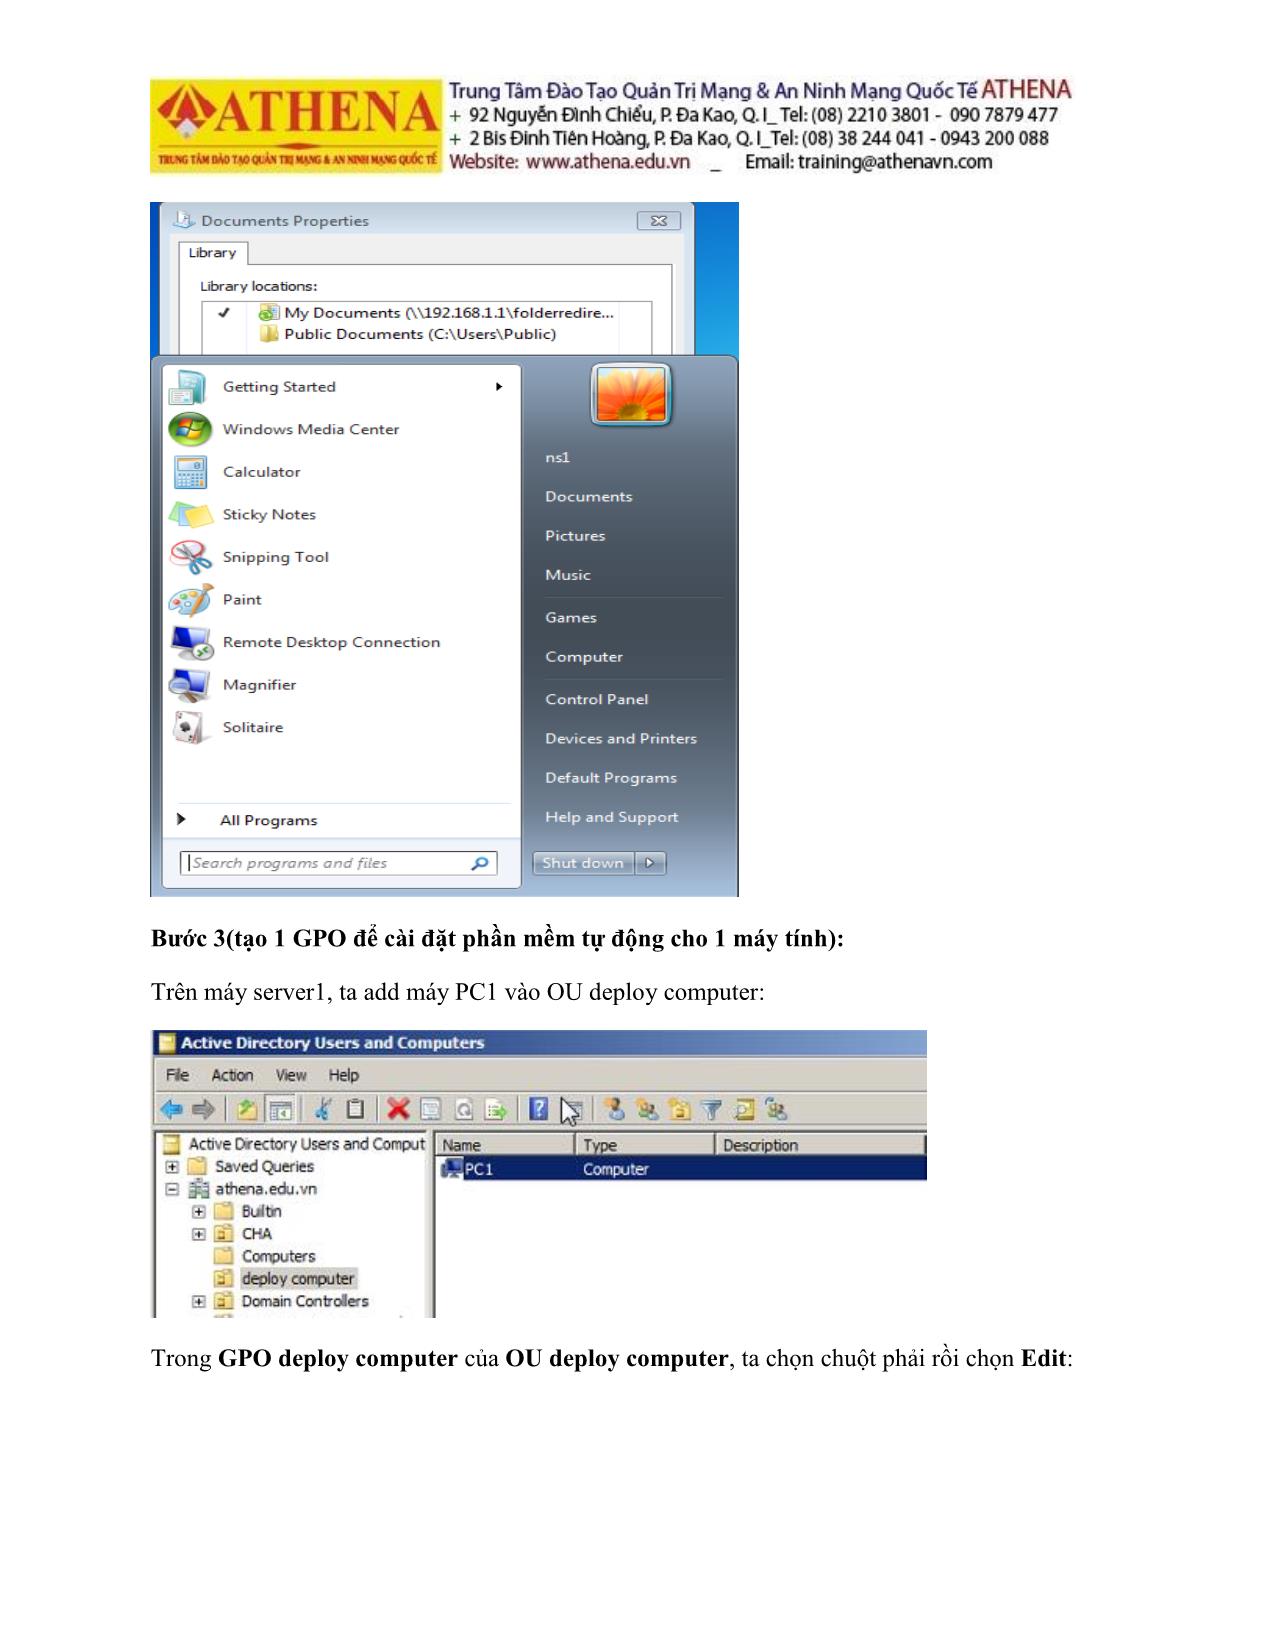
Bước 2(tạo 1 GPO để chuyển hướng thư mục My Document cho OU NHANSU):
Trong phần này ta dùng máy client Windows 7. Ta đăng nhập vào user ns1 để kiểm tra đường
dẫn của My Document:
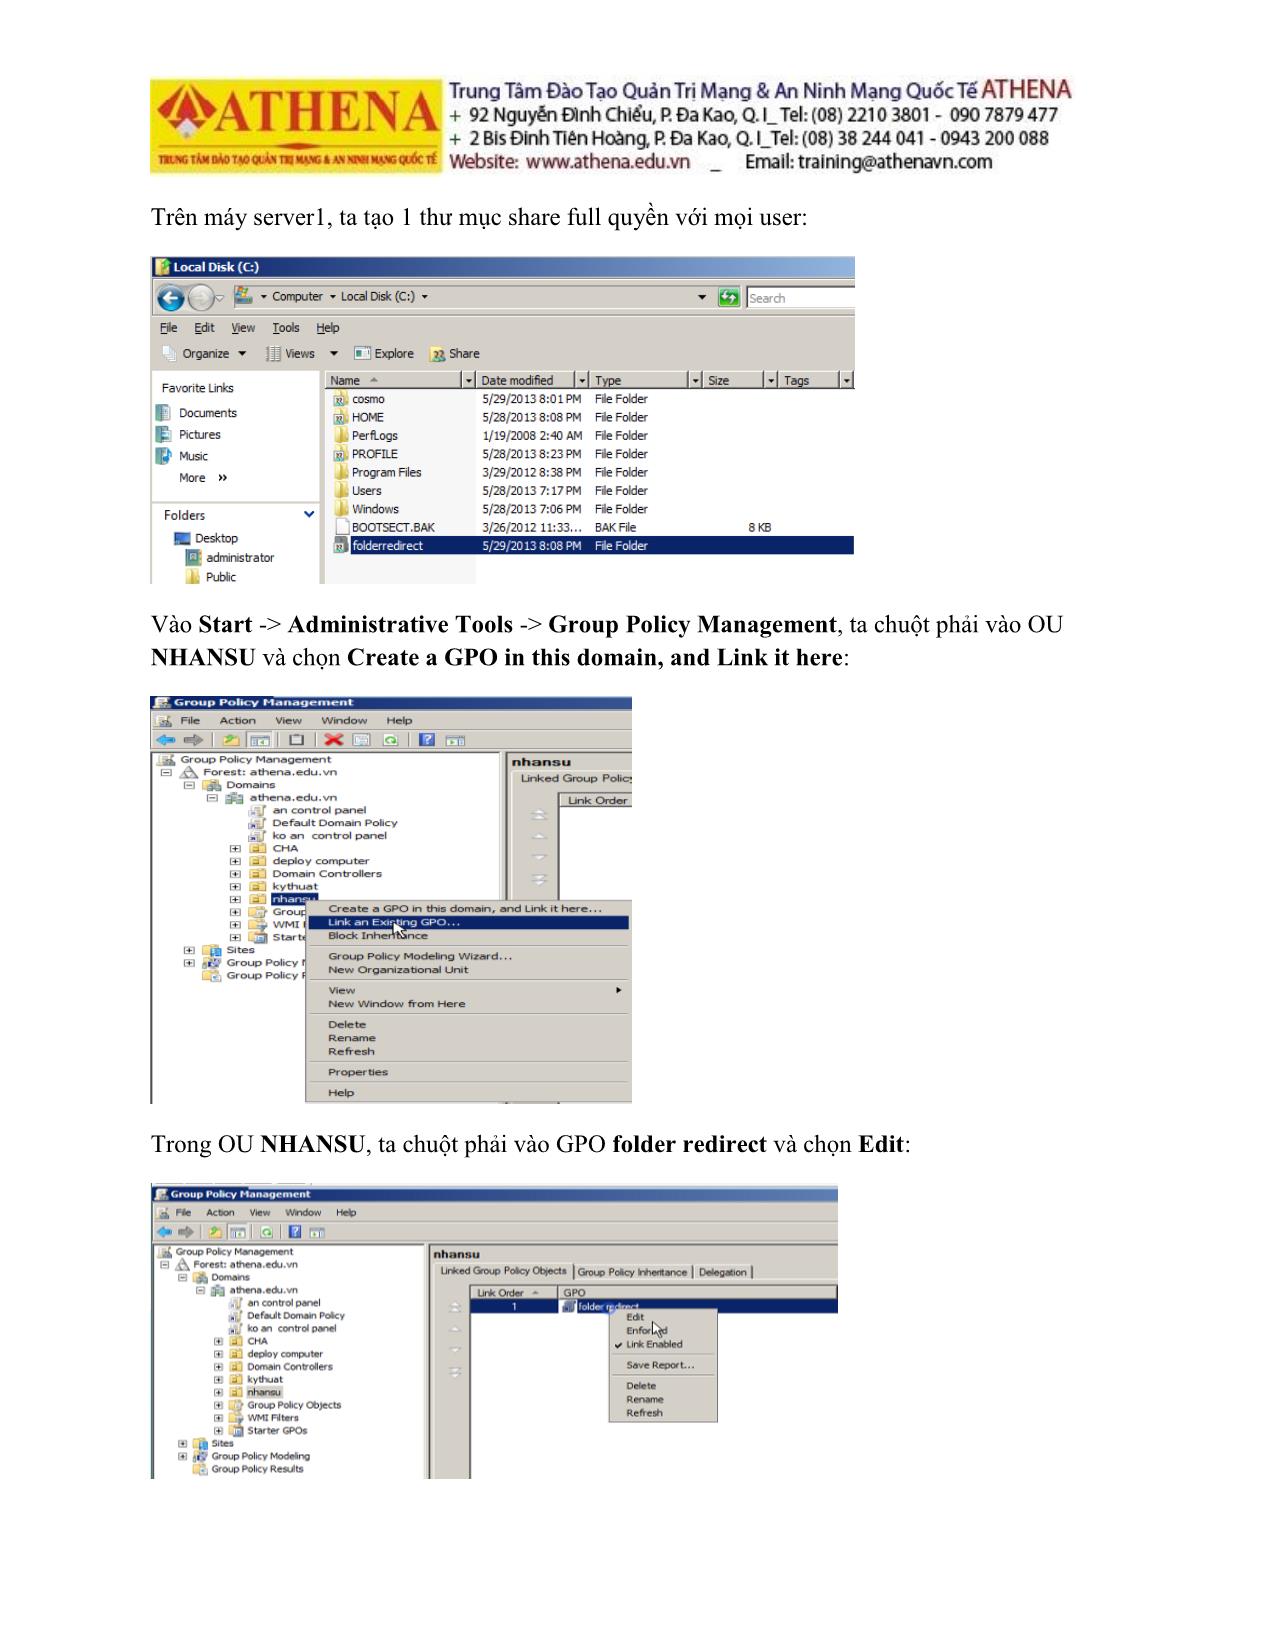
Trên máy server1, ta tạo 1 thư mục share full quyền với mọi user:
Vào Start -> Administrative Tools -> Group Policy Management, ta chuột phải vào OU
NHANSU và chọn Create a GPO in this domain, and Link it here:
Trong OU NHANSU, ta chuột phải vào GPO folder redirect và chọn Edit:
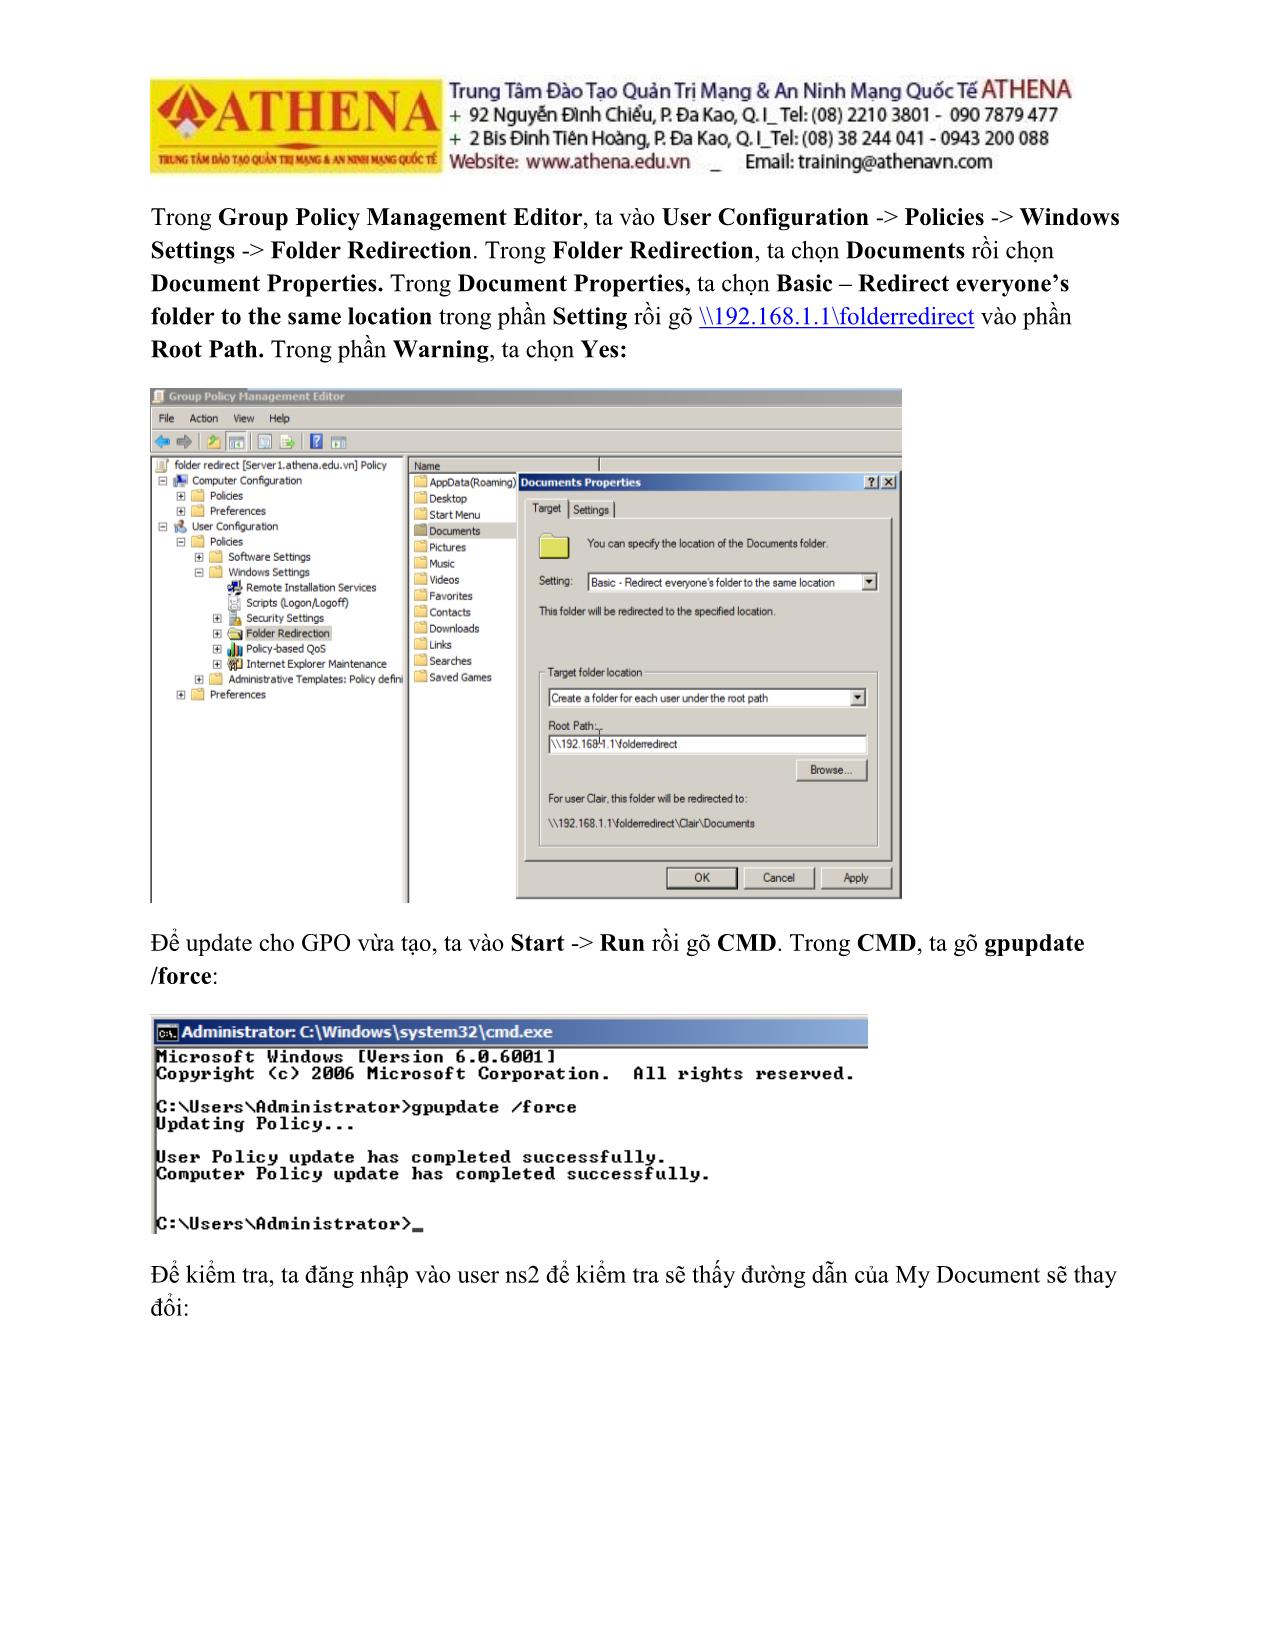
Trong Group Policy Management Editor, ta vào User Configuration -> Policies -> Windows
Settings -> Folder Redirection. Trong Folder Redirection, ta chọn Documents rồi chọn
Document Properties. Trong Document Properties, ta chọn Basic – Redirect everyone’s
folder to the same location trong phần Setting rồi gõ \\192.168.1.1\folderredirect vào phần
Root Path. Trong phần Warning, ta chọn Yes:
Để update cho GPO vừa tạo, ta vào Start -> Run rồi gõ CMD. Trong CMD, ta gõ gpupdate
/force:
Để kiểm tra, ta đăng nhập vào user ns2 để kiểm tra sẽ thấy đường dẫn của My Document sẽ thay
đổi:
Bước 3(tạo 1 GPO để cài đặt phần mềm tự động cho 1 máy tính):
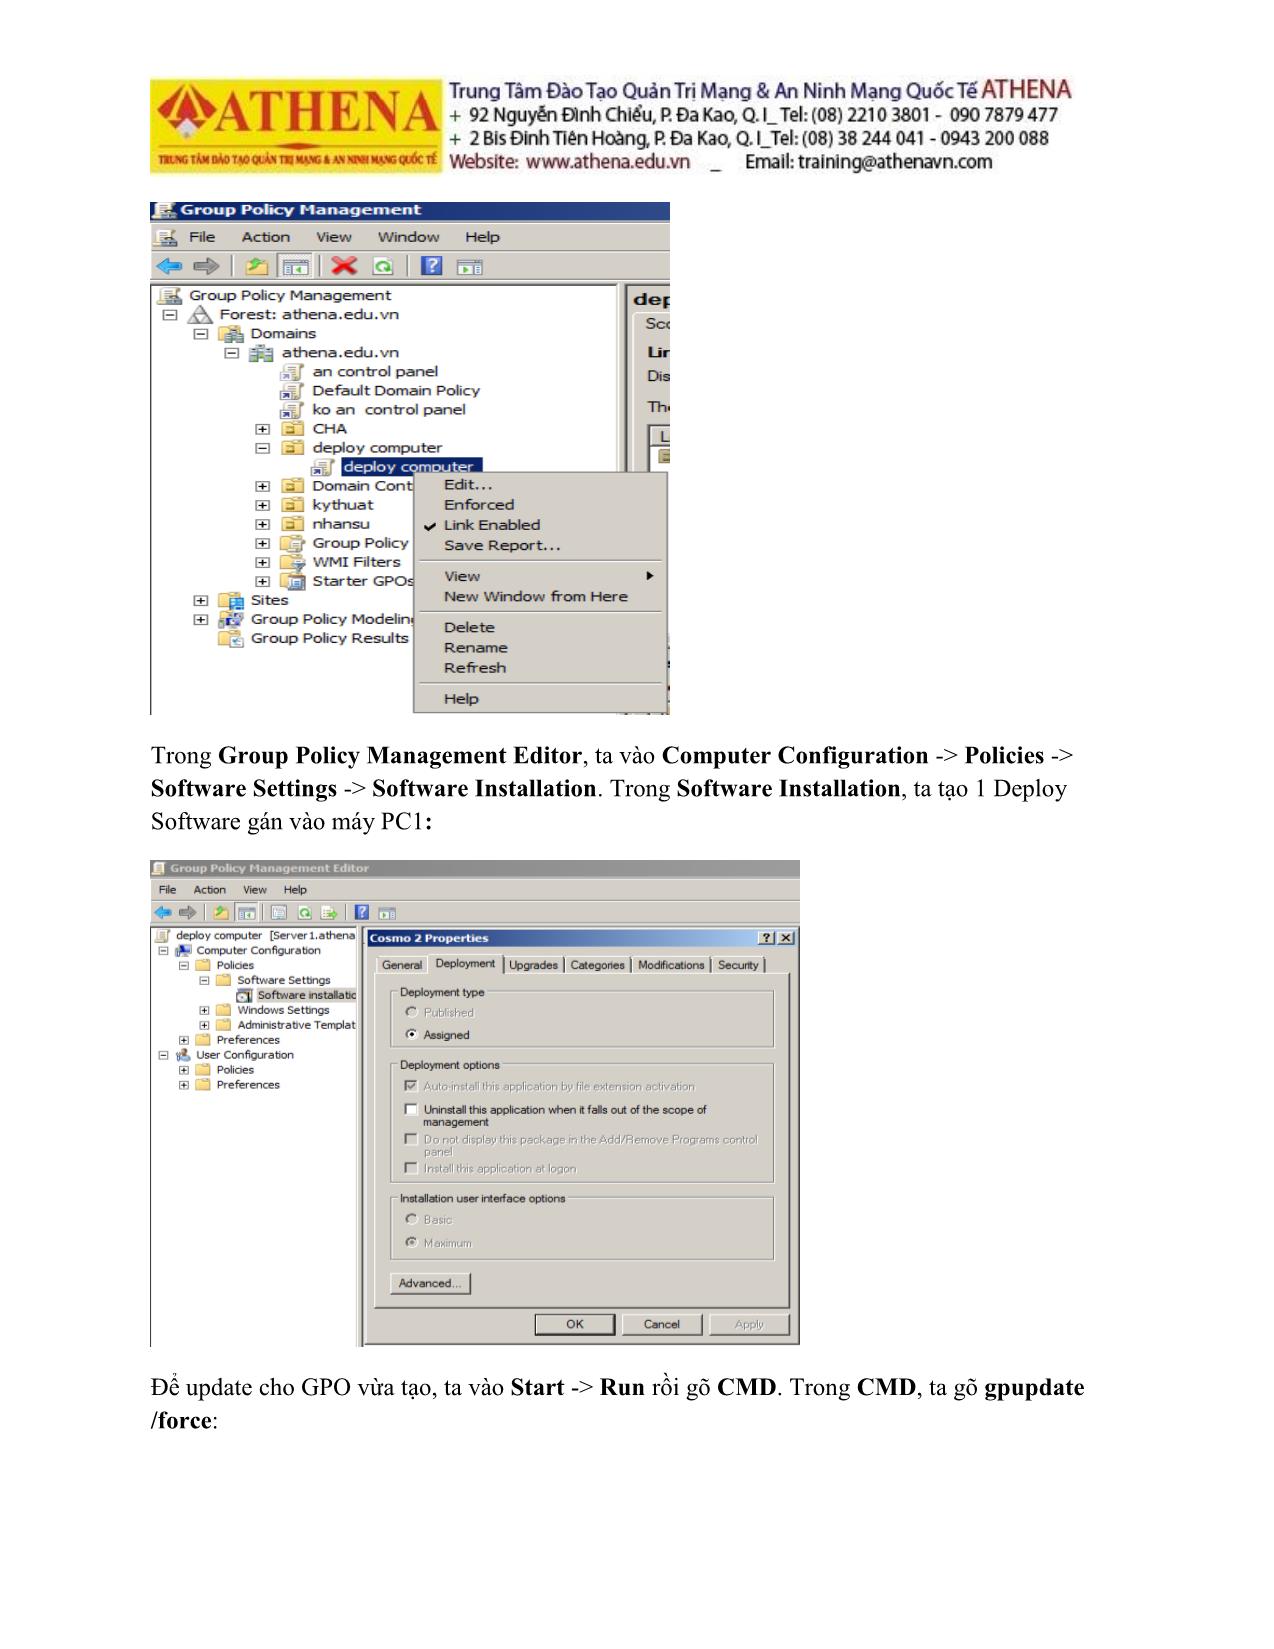
Trên máy server1, ta add máy PC1 vào OU deploy computer:
Trong GPO deploy computer của OU deploy computer, ta chọn chuột phải rồi chọn Edit:
Trong Group Policy Management Editor, ta vào Computer Configuration -> Policies ->
Software Settings -> Software Installation. Trong Software Installation, ta tạo 1 Deploy
Software gán vào máy PC1:
Để update cho GPO vừa tạo, ta vào Start -> Run rồi gõ CMD. Trong CMD, ta gõ gpupdate
/force:
Trên máy PC1, sau khi restart GPO đã có tác dụng:
Bước 4(tạo 1 GPO để tạo 1 Script chào khi user thuộc OU KYTHUAT đăng nhập hệ
thống):
Vào Start -> Administrative Tools -> Group Policy Management, ta chuột phải vào OU
KYTHUAT và chọn Create a GPO in this domain, and Link it here:
Trong OU KYTHUAT, ta chuột phải vào GPO LogonScriptvà chọn Edit:
Trong Group Policy Management Editor, ta vào User Configuration -> Policies -> Windows
Settings -> Scripts. Trong Script(Logon/Logoff), ta chọn Logon Properties rồi add 1 file
LogonScript.vbs với nội dung là msgbox “Hello” theo đúng đường dẫn khi nhấn Add:
Để update cho GPO vừa tạo, ta vào Start -> Run rồi gõ CMD. Trong CMD, ta gõ gpupdate
/force:
Để kiểm tra, ta đăng nhập vào máy client XP bằng user kt1:
File đính kèm:
 tai_lieu_deploysoftware_folderredirectionscript.pdf

